Develop
JavaScript development
JavaScript or TypeScript-based development is the preferred way to develop user-facing applications on top of the platform. Use the JS API to control pretty much anything within Datagrok, including data manipulation, adding views or viewers, developing custom viewers, registering functions, training and applying predictive models, and even building custom apps.
There are two options to run custom JavaScript code. For ad-hoc scripts, use the built-in
JavaScript editor (Functions | Scripts | New JavaScript Script). For reusable functions, viewers, and applications,
use the packaging mechanism, which is the focus of this article.
This article describes what a package is, as well as techniques for developing, debugging, publishing and using documentation.
Packages
A package is a versionable unit of content distribution within Datagrok. Essentially, it is a folder with files in it. A package might contain different things:
- JavaScript functions, viewers , widgets, applications
- Scripts written in R, Python, Octave, Grok, Julia, JavaScript, NodeJS, or Java
- Queries and connections
- Tables, files, and other objects
See our GitHub repository for examples, or follow the step-by-step guide for creating your own package.
Package structure
The simplest JavaScript package consists of the following files:
| file | description |
|---|---|
| package.json | metadata |
| package.js | entry point |
| detectors.js | detectors file |
| tsconfig.json | two lines: extends the shared base, includes src |
| README.md | package summary |
| package.png | package icon |
In addition to that, it might contain the following folders:
environments: environment configurations for scripts. Examples: Demoscripts: a collection of scripts used for computations. Examples: Chem , Demoswaggers: REST APIs in Swagger/OpenAPI format. Examples: PubChem, Samplesconnectionsandqueries: connections and queries for data retrieval. Examples: Chembl , UsageAnalysiscss: CSS files for custom styling. Example: Notebooksfilesandtables: data for demonstration and testing. Example: Chemlayouts:jsonfiles with table view layoutsschemas:yamlfiles with property schemasjobs: data jobs
package.json
package.json contains metadata, such as name, version, and dependencies:
{
  "name": "sequence",
  "fullName": "Sequence",
  "version": "0.0.1",
  "description": "Support for DNA sequences",
  "dependencies": {
    "datagrok-api": "^1.27.0"
  },
  "devDependencies": {
    "@datagrok/build-config": "^1.0.0"
  },
  "scripts": {
    "build": "grok build",
    "typecheck": "grok tsc --noEmit -p tsconfig.json",
    "lint": "eslint --ext .ts,.tsx src",
    "test": "grok test"
  }
}
A package declares only what it imports at runtime. The toolchain (the rspack bundler, swc, TypeScript,
eslint) comes from the single @datagrok/build-config devDependency; the four scripts are the same in every
package. Add dependencies with npm install <name> as usual.
Inside the public repository, all packages form one pnpm workspace. You install dependencies once at the repository root, and a package there has no devDependencies. See Build system.
package.js
Next, let's take a look at the src/package.js file:
import * as grok from 'datagrok-api/grok';
import * as ui from 'datagrok-api/ui';
import * as DG from "datagrok-api/dg";

export let _package = new DG.Package();

//name: test
export function test() {
  grok.shell.info(_package.webRoot);
}
Note that Datagrok API modules are already imported. They are also set as external modules, so that the bundler will not
include them to the output. You can include other libraries or packages, as all of them will be built-in a single bundle
file. If you choose to include other files, such as CSS, in your package, import them into package.js as well.
During the publishing step, the contents of package.js get parsed, and functions with the properly
formatted
headers are registered as Grok
functions. By annotating functions in a specific way, it is possible to register custom viewers, widgets, renderers, converters,
validators, suggestions, info panels, and semantic type detectors. If function has more than one output, it must return
JS object {param1: value, param2: value}:
//name: test
//output: string s1
//output: string s1
export function test() {
  return {s1: 'a', s2: 'b'};
}
detectors.js
detectors.js is a JavaScript file. It should define a class named <package_name>PackageDetectors
that subclasses DG.Package. It is similar to package.js but intended for smaller functions — semantic type
detectors. Datagrok calls these functions each time the user opens a table. Detectors will be uploaded separately from
the rest of the package and used to quickly inspect the data and determine the semantic type of the columns. Semantic
type tagging allows the platform to offer specific functions for data of a particular type.
Below, there is an example of a package Sequence containing a single detector detectNucleotides:
class SequencePackageDetectors extends DG.Package {

  //meta.role: semTypeDetector
  //input: column col
  //output: string semType
  detectNucleotides(col) {
    if (col.name.startsWith('nuc')) {
      col.semType = 'nucleotides';
      return 'nucleotides';
    }
    return null;
  }
}
Once registered, this function is now available across the whole platform, and can be used for semantic type detection.
Build configuration
There is no bundler configuration file in a package. grok build --skip-check (from @datagrok/build-config) bundles
src/package.ts into dist/package.js with rspack and swc, using one configuration
shared by every Datagrok package: the platform-provided modules are externals (datagrok-api/*, rxjs,
cash-dom, dayjs, wu, openchemlib, exceljs, html2canvas), CSS is injected, images and .wasm
become URLs, the output is assigned to a variable named after the package (type window.<package_name>,
e.g. window.sequence, in the browser console to check), and source maps are emitted.
A package that needs more adds an rspack.config.js with only the differences:
const {bundler} = require('@datagrok/build-config');

module.exports = bundler({
  externals: {ngl: 'NGL'},   // a global provided by the page
  wasm: 'async',             // WebAssembly modules imported as ES modules
  jsx: 'react',              // .tsx with the React automatic runtime
});
See the @datagrok/build-config README
for every option. If you rename a package, set the name field in package.json (the bundle variable
follows it) and rename the class <package_name>PackageDetectors in detectors.js.
Naming conventions
Continuing the topic we have just touched on, here are naming guidelines and general recommendations that you might consider:
- Use upper camel case for package names, for example,
ApiSamplesandOctaveScripts. Package names that comply with the rules fornpmpackages, e.g.api-samplesandoctave-scripts, are accepted as well. That being said, you can still write the desired name in thefullNamefield ofpackage.json - When defining new views and viewers, we recommend
postfixing your classes with
ViewandViewerrespectively - Functions that register an application don't need an
Appprefix/postfix. Split multi-word names with spaces and use title case, e.g.,Test Managerinstead oftestManagerApp. - The names of semantic type detectors typically start with the
detectprefix, e.g.,detectNucleotidesordetectRDSmiles - Filenames can be written in lower case, with dashes between words:
tika-extractor.pyandchord-viewer.js
Development
You develop packages locally, but they run inside the remote Datagrok platform. To enable the best possible experience for developers, we established a workflow where the package is uploaded to the remote server at startup, and then gets served from the server. By associating local JavaScript files with the remote sources in your favorite IDE, it is possible to hide the complexity of that scenario. For instance, you can set breakpoints, do step-by-step execution and generally debug the program in the regular way. Of course, you can always use the debugger that comes with the browser.
To develop Datagrok packages, we recommend that you start with creating a package template. Then, set up your IDE in such a way that when starting a project, it would publish the package, and then start the platform.
Packages deployed in the development mode are visible only to the authors. This ensures that multiple people can simultaneously work on the same package.
General notes on package development
Our approach to extending the system is providing one canonical, convenient way for developers to achieve the task, at the same time exposing enough extension points to enable deep customization. Same concepts apply to JavaScript development. We do not impose any requirements on the UI frameworks or technologies used for the JavaScript plugins, although we encourage developers to keep it simple.
To simplify development, Datagrok provides an Inspector tool (Alt + I) that lets developers peek under the hood of
the platform. Use it for understanding which events get fired and when, how views and viewers are serialized, what is
getting stored locally, what widgets are currently registered by the system, etc.
Environments
In order to isolate packages being debugged from the production instance, we recommend running them against the dev
instance, if possible. To change Datagrok's server, add a new developer key to your local config.yaml and edit
the scripts section in the package.json file.
Managing dependencies
Your plugin may depend on unreleased features in the core, libraries, or other plugins. Our tooling handles this, but you must annotate the dependencies:
-
Dependency on the new code in the libraries. Modify the package.json file in your plugin, and change the library path to the relative path of the corresponding library, like that:
"dependencies": {"@datagrok-libraries/utils": "../../libraries/utils",}When the plugin is ready for publishing:
- increment its version in package.json
- add the change log message to changelog.md
- commit to master
CI-CD will automatically increment package version of the library, and publish the plugin.
Important for Public ReleaseCheck the dependencies of the library you are linking to! If the library (e.g.,
utils) depends on the local
API ("datagrok-api": "../../js-api"), your package will not be deployed to the public environment. The CI/CD
pipeline interprets this transitive dependency as a requirement for the unreleased core platform. To ensure your package
auto-updates on public, the libraries it uses must reference a published version of datagrok-api, not the local path.
:::
-
Dependency on the latest JS API: Update the package.json like that:
"dependencies": {"datagrok-api": "../../js-api",},This means that going forward, the plugin will only work with the next (unreleased yet) version of the core.
-
Dependency on another plugin: This is a popular question, but we do not provide any officially supported solution yet. You'll have to manage it manually. Generally, cross-plugin dependencies should be avoided if possible.
Publishing
Version control
Each package has a version number. All objects inside the package are being deployed according to the package version. When a package gets published, a "published package" entity gets created. It is associated with the package, and has additional metadata (such as publication date). Typically, only one version of a package is visible to a user. Administrators can manage published packages and decide which versions should be used. It is possible to roll back to an older version, or assign a particular version to a particular group of users.
Importantly, if the version changes, there will be an independent instance of each package asset. Multiple versions of a package can be deployed at one moment, and the administrator can switch between them. All users will only see objects that belong to the current package version.
There is a special debug version that can be deployed for each package. If the developer applies it, it becomes active
for the current package until the developer deletes it or changes their developer key. In this case, the developer can
see objects from their version of package, and changes will not affect other users package representation. This version
will no longer exist after the developer releases their package.
Building package
The package source must be bundled before it can run in the browser. grok publish builds first, so
you rarely run the build yourself. When you do, use npm run build in the package. In the public
repository, use grok build, which also builds the libraries the package depends on. See
Build system.
The build script is grok build: bundle, generate the function metadata files, run grok check.
Keep the script name; do not change what it runs.
Publishing modes
Use the following flags to specify who can access your package:
- In
--debugmode, packages are accessible by the developer only (default). - In
--releasemode, packages are accessible by everyone who has the privilege.
To publish a package, run grok publish from the package folder: it builds the package and uploads it in
debug mode to the default server from config.yaml. Add --release for a release build, and a server
alias or URL to target another server:
grok publish                    # debug build to the default server
grok publish dev                # debug build to the `dev` alias
grok publish dev --release      # release build to the `dev` alias
Type grok for instructions or grok publish --help to get help on this particular command.
In addition, you can pass another server either as URL or server alias from the config.yaml file:
grok publish dev
grok publish https://dev.datagrok.ai/api --key <dev-key>
Make sure to specify the developer key for a new server.
Source control
Packages can be deployed from Git as well as other resources, which allows for convenient team collaboration and
version management. See the full list of source types in
the Package Browser (Manage | Packages | Add new package).
When developing a package with your team, it's a good idea to commit code to the repository first and then publish your package from there. Our public GitHub repository is a telling example of this workflow. We also welcome contributions, which you can learn more about in this article.
To publish a package from the repository, you need to open Manage | Packages | Add new package
first. Once the window appears, choose Git as the source type, enter the URL to your repository, and specify the
package directory relative to its root. Click on LOAD PACKAGE METADATA to get the package name and description.
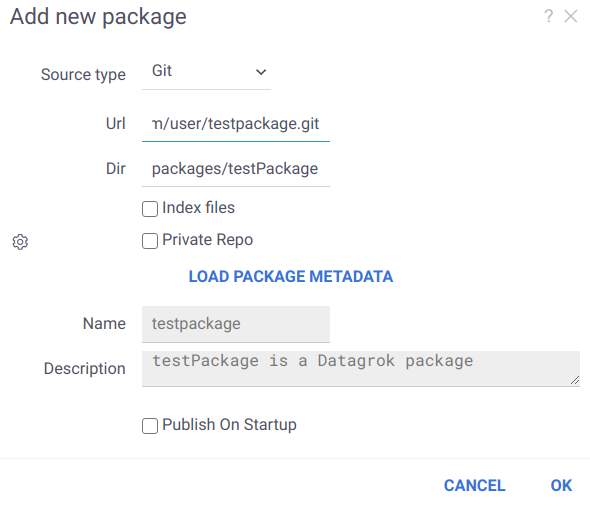
If necessary, you can specify additional settings and then publish the package.
Continuous integration
Standard package development includes the stages below:
- Development
- Build
- Test
- Publication
Most of the above steps can be automated using CI/CD tools. You can use our workflow in GitHub Actions as an example. It builds, tests, and publishes our public packages.
Tests in automation tools
To test a package in CI, you need the following:
- Set up a stand for workflow. It is elementary to do using docker-compose
- Install the latest datagrok-tools
- Publish package to the stand
- Run tests using grok test
Install dependencies in GitHub Actions
To install dependent grok packages in our
workflow, you can
use devDependencies in package.json We used an individual grokDependencies
section earlier, but now this content is moved to devDependencies for a better CI process
{
  "devDependencies": {
    "@datagrok/chem": "latest"
  }
}
Skip tests in GitHub Actions
To skip running tests in our
workflow you can use skipCI
in package.json
{
  "skipCI": "true"
}
Publication with automation tools
Package publication is compatible with automation tools. You can pass your server URL and developer key explicitly through command line:
grok publish <url> -k <dev-key>
Troubleshooting Public Releases
If you committed a version increment to master but the package was not updated on the public environment:
- Check Transitive Dependencies: Verify if any libraries you depend on (e.g.,
@datagrok-libraries/utils) are currently linked to the local API source (../../js-api). If a library forces a dependency on the local API, the build system assumes the package requires unreleased core features and prevents deployment to the stable public environment.
Sharing
Just like other entities on the platform, packages are subject to privileges. When
sharing with users and groups of users, you can specify the rights (for viewing and editing) and choose if you want to
notify the person in question. These privileges can be managed not only from the user interface, but also directly from
the package. To do that, you should specify the eligible user groups in the package.json file:
{
  "canEdit": [
    "Developers"
  ],
  "canView": [
    "All users"
  ]
}
To see packages available to you, click on Manage | Packages, or
follow this link from outside the platform.
Connections
Data connections in Datagrok allow users to connect to various data sources such as databases, cloud storage, and APIs.
These connections are defined in JSON files stored under the /connections folder.
When defining a connection, users can include credentials for authentication. To ensure security, Datagrok provides a mechanism to substitute placeholders in the credentials section with environment variables during the deployment process.
For example, consider the following JSON file defining a connection to the CHEMBL database:
{
  "#type": "DataConnection",
  "name": "Chembl",
  "friendlyName": "CHEMBL",
  "parameters": {
    "server": "db.datagrok.ai",
    "port": 54325,
    "db": "chembl",
    "cacheResults": true
  },
  "credentials": {
    "parameters": {
      "login": "${CHEMBL_LOGIN}",
      "password": "${CHEMBL_PASSWORD}"
    }
  },
  "dataSource": "Postgres",
  "description": "CHEMBL DB",
  "tags": [
    "demo",
    "chem"
  ]
}
In this example, ${CHEMBL_LOGIN} and ${CHEMBL_PASSWORD} are placeholders for the login and password credentials.
During deployment using the grok publish command,
Datagrok automatically replaces these placeholders with the corresponding environment variables, such
as process.env.CHEMBL_LOGIN and process.env.CHEMBL_PASSWORD, respectively.
Debugging
See debugging for details.
Bundled packages
If you deploy a package in debug mode (--release isn't passed to grok publish), the bundle's source maps
(always emitted by grok build --skip-check) let you find your package sources in the top (root) section of the source
tree by its decapitalized name.
Source-based packages
Deploying such package locates it to the Datagrok host URI (such as https://dev.datagrok.ai) under
api → packages/published/flies → <PACKAGE_NAME>/<VERSION>/_/<DIGIT>, where you'd set breakpoints.
Troubleshooting debugging
-
Publish in debug mode (no
--release): release bundles are minified and the IDE won't get source code locations. Source maps are always emitted bygrok build --skip-check. -
Make sure the required plugins / debuggers for Chrome debugging are installed in your IDE.
Package settings
A package can have settings, which are either set programmatically or by users in the package's context panel. Every
user group has its own settings configuration. In the interface, users will be able to adjust the settings for each
group they belong to. To include a settings editor into a package, add the list of properties to the package.json
file:
"properties": [
{
"name": "Property name",
"propertyType": "string", // `DG.TYPES_SCALAR` are supported
"choices": ["value #1", "value #2"], // Optional field with values of the property type
"defaultValue": "value #2", // Optional field with a default value (it should be in choices, if they are given)
"nullable": false                     // Optional field determining whether the property value can be null
}
]
To retrieve the state of package settings in code, use the getProperties method of DG.Package:
const props = await _package.getProperties();
The above call outputs an object where the keys are property names and the values are serialized property values. It's possible to customize the editor's appearance by defining a special editor function.
Documentation
According to this study , in terms of the strategies used for understanding API documentation, different developers fall into several groups: systematic, opportunistic and pragmatic. These findings are consistent with our experience. For Datagrok's documentation, we have established an approach that enables developers from either of the above-mentioned groups to be productive.
- Sample browser (
Functions | Scripts | New JavaScript Script) is an interactive tool for browsing, editing, and running JavaScript samples that come with the platform. Samples are grouped by domain, such as data manipulation, visualization, or cheminformatics. They are short, clean examples of the working code using Grok API that can be copy-and-pasted into the existing solution. The samples are also cross-linked with the help system. - Grok API provides complete control over the platform. JS documentation is available.
- Platform help explains the functionality from the user's point of view. Where appropriate, it is hyper-linked to samples and demo projects. In the near future, we plan to turn it into the community wiki, where users will be contributing to the content. The same web pages are used as an interactive help within the platform (you see help on the currently selected object).
Also, you can connect with fellow developers on either community forum or slack.
See also: