Rich Function View
RichFunctionView is an advanced UI editor to create a complex full-featured interface for your script.
It has all the features of the basic scripting. In addition, it allows you to:
- Enhance inputs and outputs
- Review historical script runs
- Provide custom docs and export
- Use model parameters optimization capabilities with your script without a single line of the code.
- Integrate into workflows
To add input validators, actions or restrictions to a single script without
building a multi-step workflow, wrap it in a one-step
workflow with
compactView: true: it opens in the same compact layout with the workflow
features enabled.
When a form doesn't fit your model, build the view in code instead: see Custom function view.
Ensure that the Compute2 and WebComponents packages are installed
Enabling RichFunctionView UI editor
To enable RichFunctionView, add editor: Compute2:RichFunctionViewEditor tag
to your following code as it is shown:
- Result
- Python / R / Octave / Julia
- Javascript / NodeJS
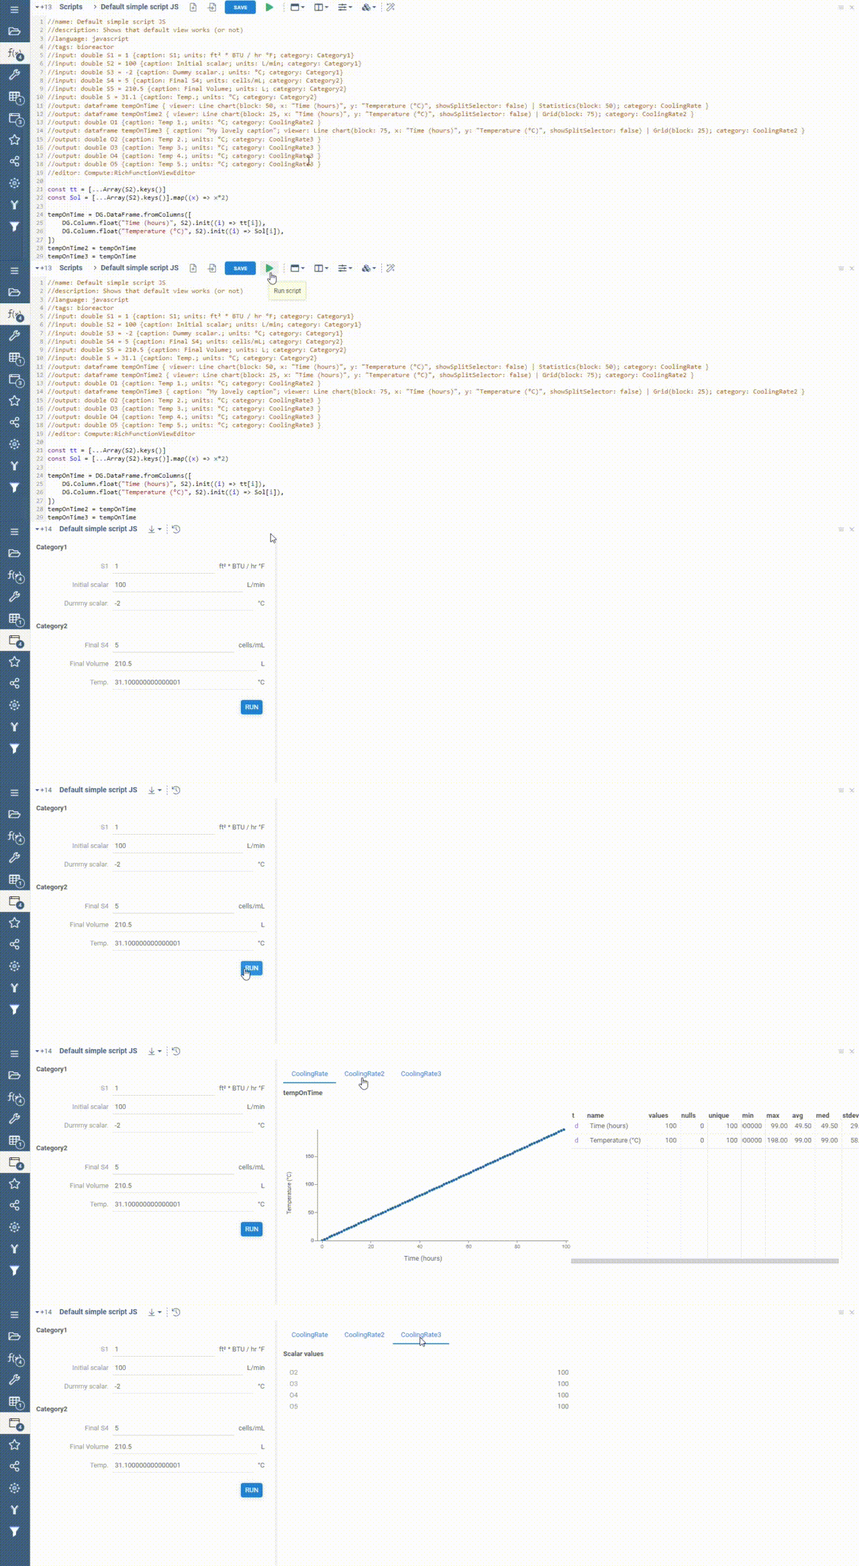
#editor: Compute2:RichFunctionViewEditor
//editor: Compute2:RichFunctionViewEditor
Features of the RichFunctionView affect GUI only and do not affect computations. Use the RichFunctionView only when you are sure that the script works as expected.
Enhance inputs and outputs
Visualize input data
You can add viewers for input dataframes to review input data before starting computations, same way as for output viewers.
- Result
- Short sample
- Full sample
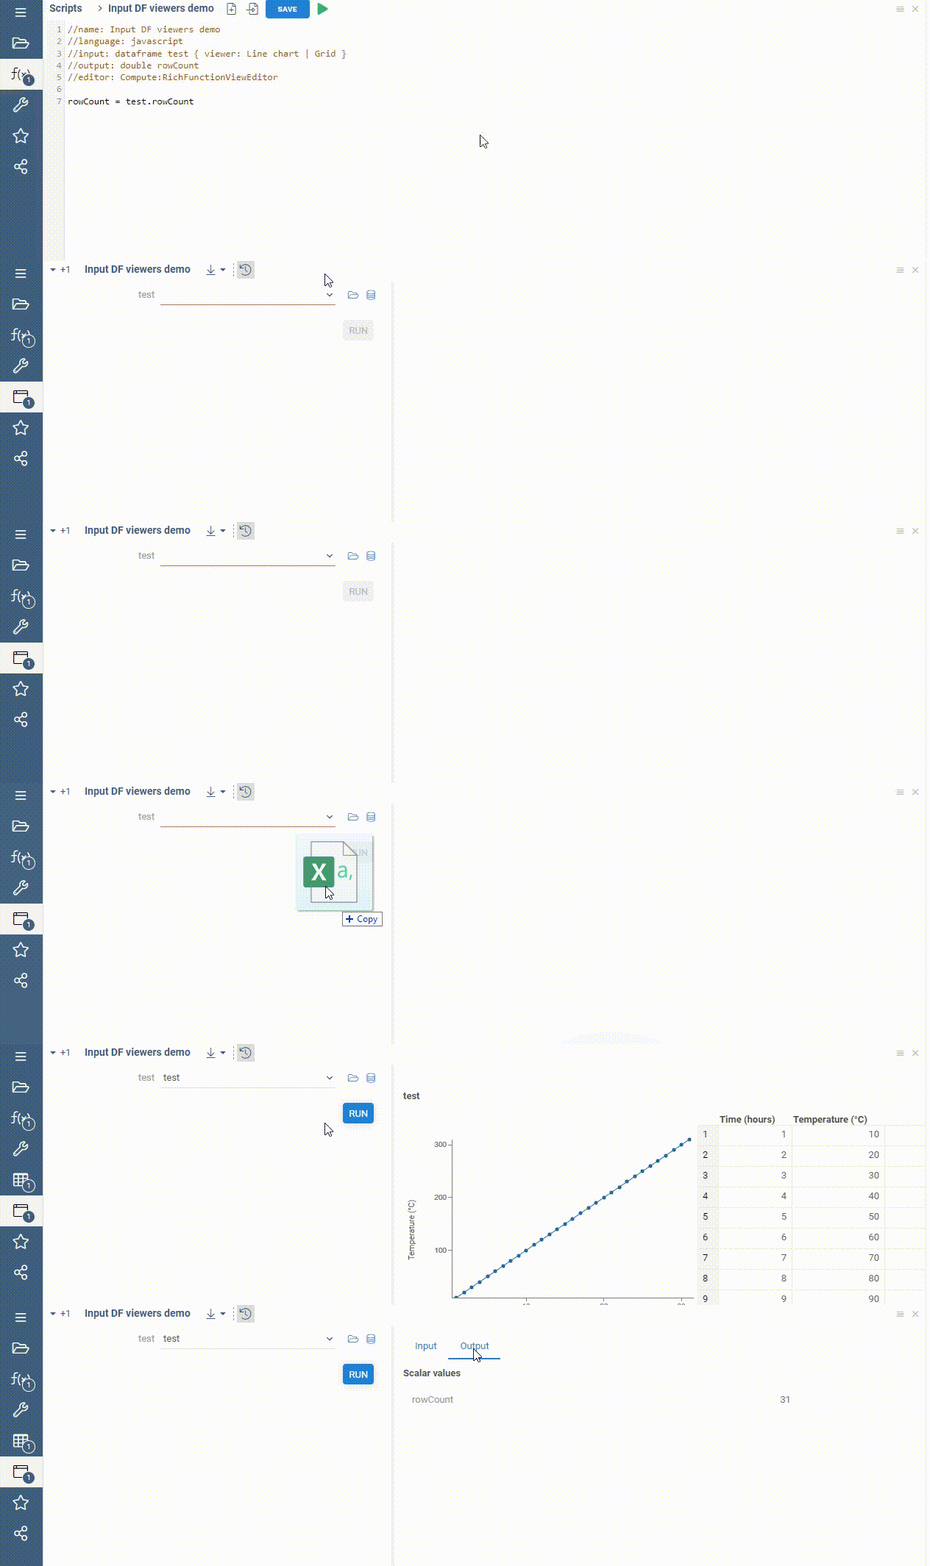
//input: dataframe test { viewer: Line chart | Grid }
//name: Viewer properties demo
//language: javascript
//sample: demog.csv
//input: dataframe test { viewer: Line chart | Grid }
//output: dataframe test2
//editor: Compute2:RichFunctionViewEditor
test2 = test.clone();
You can specify input viewer's properties to control their appearance.
Viewer's properties are listed in the braces right after the viewer's
name. A full list of the viewer's properties may be found by
right-clicking on it and selecting the Properties... (dev tools) menu item.
Some options could be set directly in a chart annotaion via
Grid(prop: val) syntax, however for many options a js viewer object
must be used. To obtain js properties object a Dev Tools platform
package must be installed. Right click on the chart, then To Script,
then To JavaScript. The second argument is the properties
object. For the purpose of directly using this object there is a
viewersHook annotation. It must be a js function full name. Since
viewer hook is synchronous, viewersHook function must just return
another js function, which accepts the following arguments:
- ioName:
string- name of the input or output - type:
string- viewer type - viewer:
DG.Viewer- viewer js object - meta?:
any- optional io metadata, available only in workflows.
function MyScriptViewersHookMaker() {
  return (ioName: string, type: string, viewer: DG.Viewer) => {
    viewer.setOptions(...)
  }
}
When used inside a workflow, the hook also receives a meta
argument and is re-invoked whenever metadata published by
meta links changes. A workflow step can set its own viewersHook
instead, which replaces the script's hook for that step. See the workflow-side
viewersHook reference for the full signature.
If the hook can't be made, because the function is missing or fails, a warning says so, and the viewers and exports go on without it.
RichFunctionView supports the dockSpawnConfig option to control the
viewer's width. By default, any viewer occupies all available
space. Inside dockSpawnConfig there must be a json map with a viewer
tab name and the following config.
interface DockSpawnConfigItem {
  'dock-spawn-dock-type'?: 'left' | 'right' | 'up' | 'down',
  'dock-spawn-dock-to'?: string,
  'dock-spawn-dock-ratio'?: number,
}
Viewer tab name is this context should match exactly (including
spaces) the viewer name rendered in the app, for example a line chart
for output named Trajectory will be Trajectory / Line chart. dock-spawn-dock-to is also using this naming convention.
- Result
- Short sample
- Full sample
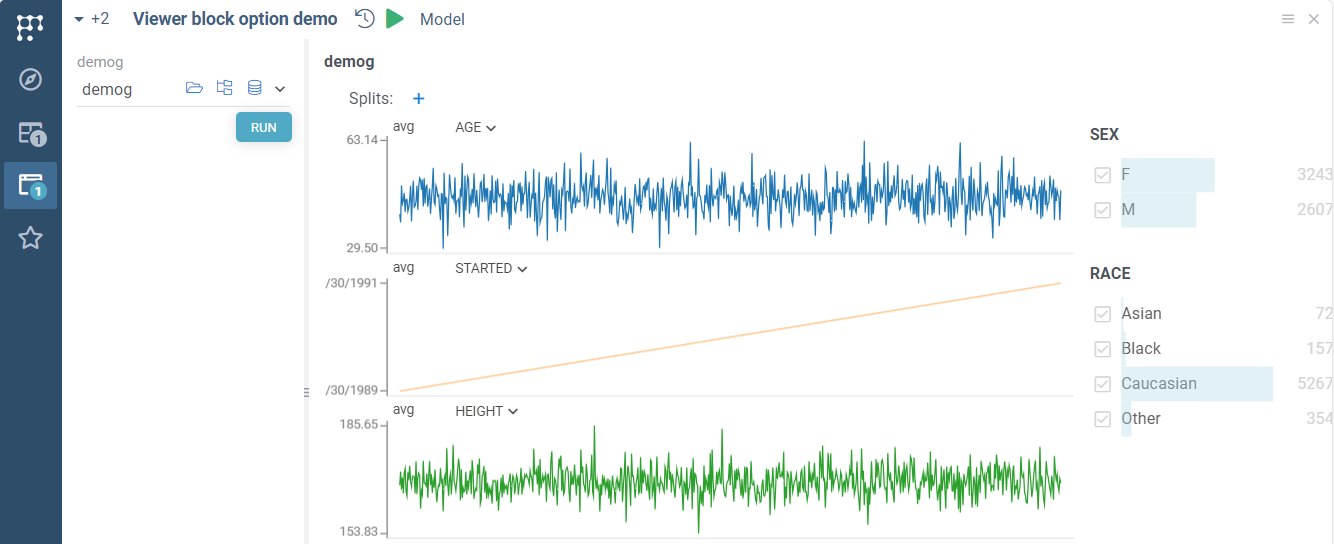
//input: dataframe demog { viewer: Line chart | Filters }
//name: Viewer block option demo
//language: javascript
//input: dataframe demog { viewer: Line chart | Filters }
//output: dataframe test2
//editor: Compute2:RichFunctionViewEditor
test2 = demog.clone();
Group scalar outputs
You can use the category keyword to group scalar output parameters.
In the case of output parameters, the category tag specifies
the output tab used to show the output parameter values.
The following code generates UI with three output tabs:
- Result
- Short sample
- Full sample
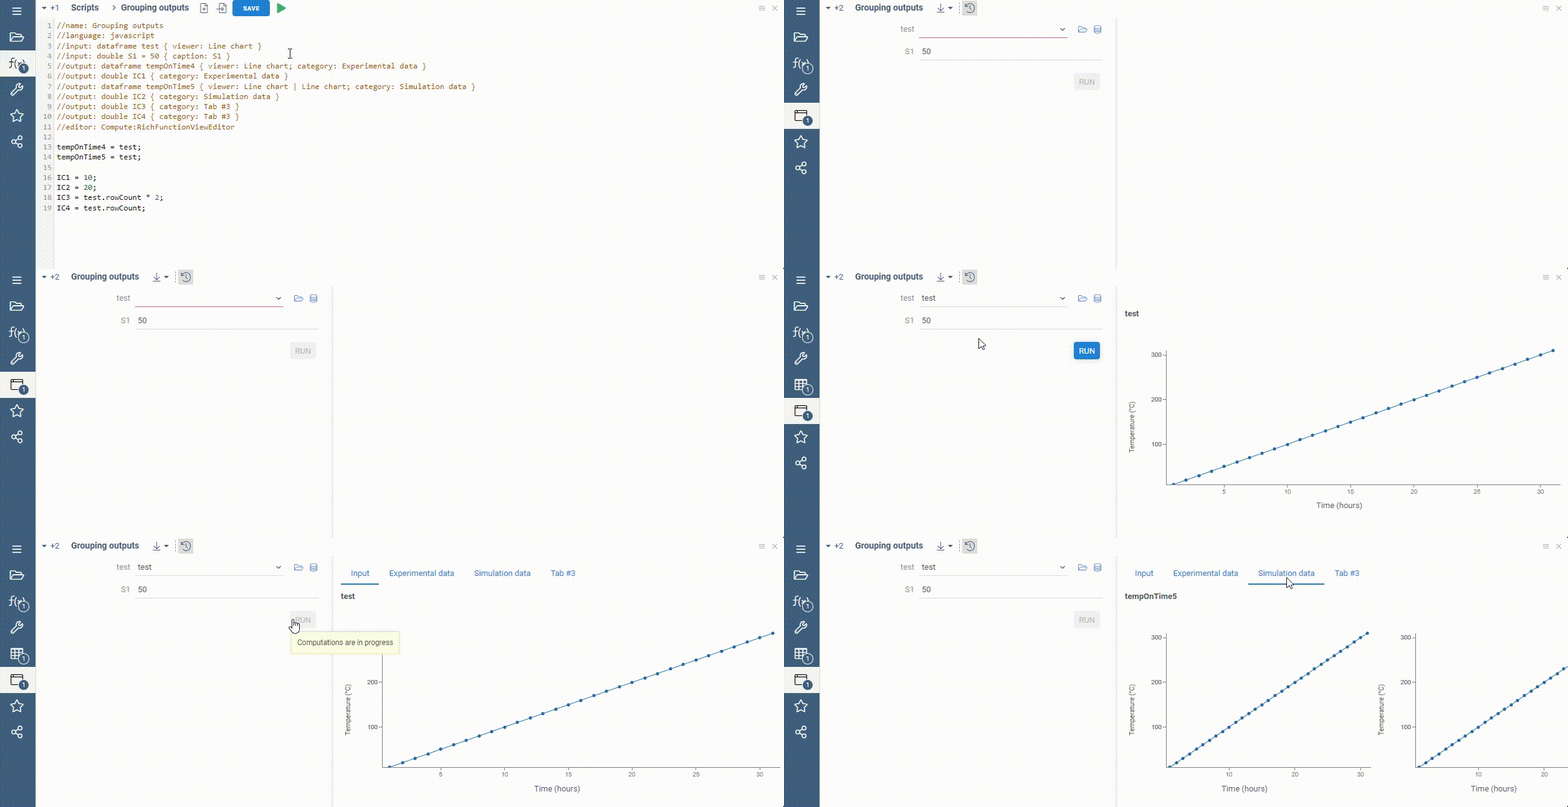
The view includes 4 tabs in total since there is a separate tab for input dataframe viewers.
//output: dataframe tempOnTime4 { viewer: Line chart }
//output: dataframe tempOnTime5 { viewer: Line chart }
//output: double IC3 { category: Tab #3}
//output: double IC4 { category: Tab #3}
//name: Grouping outputs
//language: javascript
//input: dataframe test { viewer: Line chart }
//input: double S1 = 50 { caption: S1 }
//output: dataframe tempOnTime4 { viewer: Line chart }
//output: double IC1 { category: Experimental data }
//output: dataframe tempOnTime5 { viewer: Line chart }
//output: double IC2 { category: Simulation data }
//output: double IC3 { category: Tab #3 }
//output: double IC4 { category: Tab #3 }
//editor: Compute2:RichFunctionViewEditor

tempOnTime4 = test;
tempOnTime5 = test;

IC1 = 10;
IC2 = 20;
IC3 = test.rowCount * 2;
IC4 = test.rowCount;
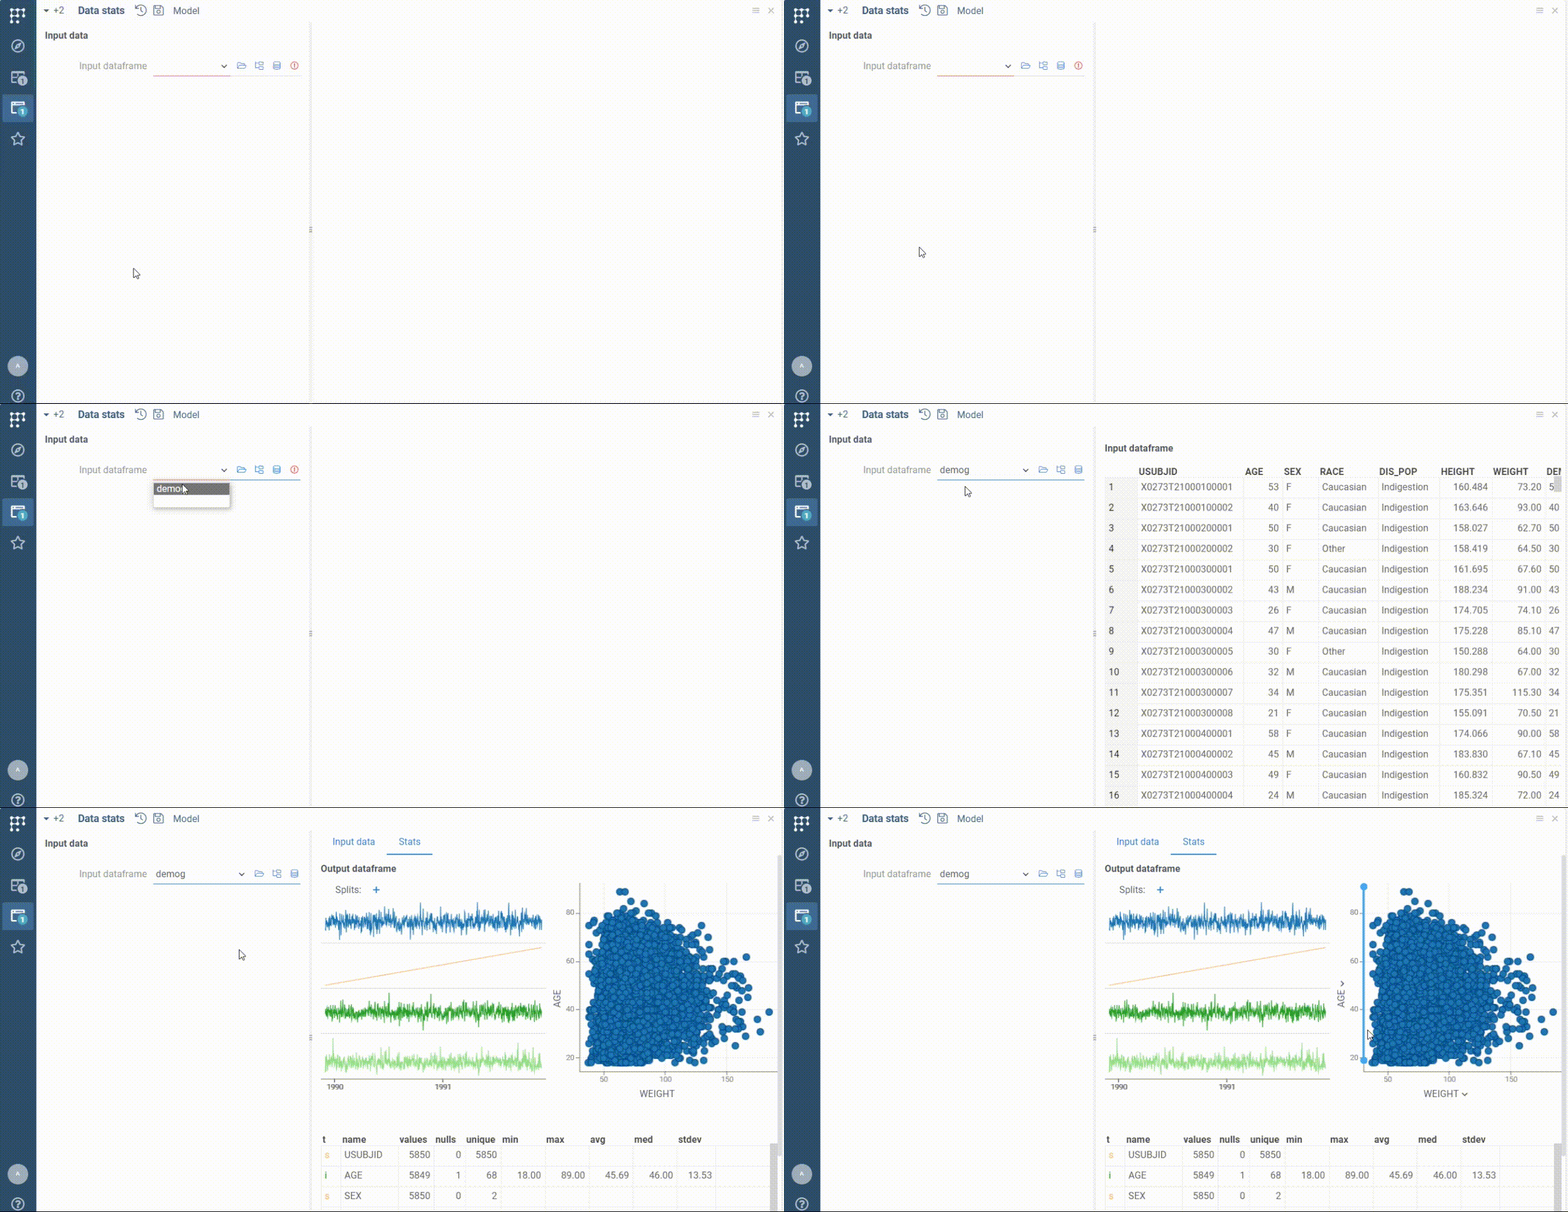
Automatic script rerun
You can run scripts automatically on UI opening and/or on any input change.
This feature is useful for fast prototyping. We recommend using it only
on fast Javascript scripts only to avoid repeatable runs of computational-heavy code.
The automatic function calls are not saved, so to save results to the run history you should press the Save button manually.
- Result
- Short sample
- Full sample
//meta.runOnInput: true
//name: Data stats
//language: javascript
//tags: demo
//input: dataframe inputDf {caption: Input dataframe; viewer: Grid(); category: Input data}
//output: dataframe outputDf {caption: Output dataframe; viewer: Line chart | Scatter plot | Statistics; category: Stats}
//editor: Compute2:RichFunctionViewEditor
//meta.runOnInput: true

outputDf = inputDf.clone();
Form layout and run controls
A few annotations control how the input form and the Run button are presented, without affecting computations.
Customize the Run button label
Use meta.runLabel to change the text on the Run button. The default is Run. When the
output is outdated after a previous run, the button automatically switches to Rerun regardless
of this label.
//meta.runLabel: Simulate
Render the input form as a tab
By default the input form is docked on the left side of the view. Set meta.formAsTab to true
to render it as a regular tab next to the output viewers instead.
//meta.formAsTab: true
When formAsTab is enabled, dock-type hints from dockSpawnConfig on
the inputs panel are ignored.
Workflow-oriented behavior
The annotations below take effect whenever a script is rendered through RichFunctionView, but they are designed for workflow UX — where the user navigates between many steps and wants to focus on outputs. In a standalone single-script view they still work, but the use case is unusual.
Keep the Run button always available
By default the Run button is hidden once the current run is up to date. Enable the rerun
feature flag to keep it available, so the user can always launch a fresh run with the same
inputs.
//meta.features: {"rerun": true}
Inside a workflow the flag controls the Rerun button in the step's navigation toolbar (Back / Run / Next / Update). In standalone RichFunctionView the same flag keeps the in-form Run button visible after a completed run.
Hide inputs behind toggles
In a workflow, inputs whose values are set by the workflow with
the disabled or restricted restriction are
hidden by default. A Show linked inputs (N) row on top of the form shows them. A link icon
next to such an input says the value is the one the workflow set; once the value differs, the
inconsistency icon replaces it. Inputs with info or no restriction stay visible. The
standalone Rich Function View has no toggles and ignores meta.inputToggles and
meta.inputsHidden.
Set meta.inputToggles to choose which inputs are hidden and how the rows read. Each entry is
one row, Show <caption> (N), shown only while it hides something:
//meta.inputToggles: [{"caption": "additional device params", "categories": ["Pump", "Valves"], "linked": true}, {"caption": "solver settings", "inputs": ["atol", "rtol"]}]
//input: double pumpRate {category: Pump}
//input: double atol = 1e-6
//input: double rtol = 1e-4
| Field | Meaning |
|---|---|
caption | Text of the row. |
categories | Inputs whose category annotation is in the list. |
inputs | Inputs by name. With categories, an input matching either is selected; without both, every input is. |
linked | With true, only selected inputs with the disabled or restricted restriction are hidden. Otherwise the selected inputs are hidden whatever their restriction. |
An input belongs to the first entry that selects it. Entries with the same caption share one
row, so adding {"caption": "linked inputs", "inputs": ["x"]} after the default entry puts an
input without a restriction under the linked inputs row. The meta replaces the default
[{"caption": "linked inputs", "linked": true}], and [] hides nothing.
To hide every input, set meta.inputsHidden to true. All inputs then go behind the
Show linked inputs (N) row, linked or not, as with [{"caption": "linked inputs"}].
meta.inputToggles takes precedence over it.
//meta.inputsHidden: true
Some inputs stay visible whatever the toggles say:
- an input with errors or warnings, or with a value that differs from the one the workflow set;
- an input with the
keepVisible: trueannotation, as in//input: double x {keepVisible: true}.
A dataframe input with the mutateOnly: true annotation and the restricted or info
restriction has its form input disabled, so it can be edited in its viewers but not replaced. See
Consistency.
An input with the hidden UI metadata stays hidden. The rows remember their state per function
for the browser session, and apply to read-only steps too.
Provide custom docs and export data
Add the readme
You can add a customized readme file to your script. The linked Markdown file will be available by clicking icon on the ribbon panel. The readme file will appear inside the panel on the right side.
- Result
- Short sample
- Full sample
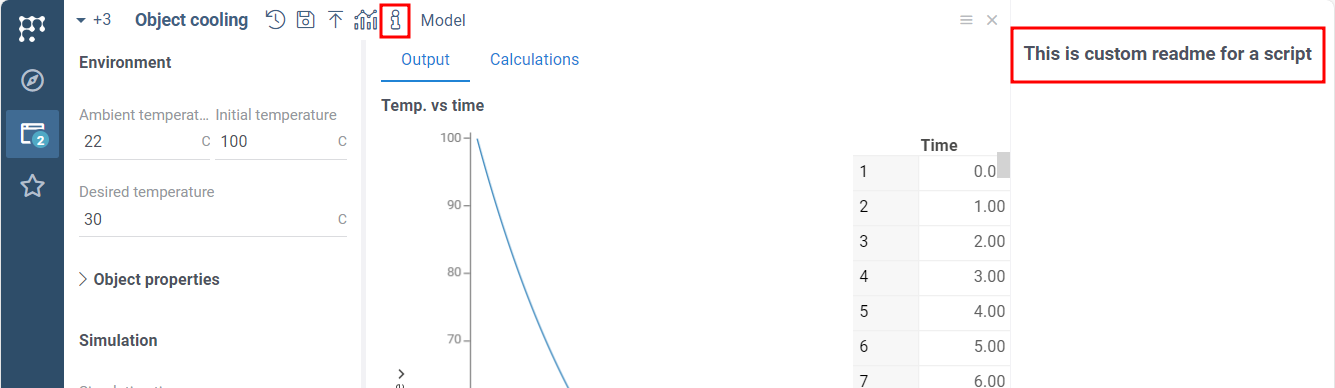
Following code will search for the help file in your Datagrok's Home folder.
//meta.help: readme.md
The following code will search for the help file in the particular package (e.g., Compute).
See the details about packages in the
convert script to a package function section
//meta.help: Compute/readme.md
//name: Data stats
//language: javascript
//tags: demo
//input: dataframe inputDf {caption: Input dataframe; viewer: Grid(); category: Input data}
//output: dataframe outputDf {caption: Output dataframe; viewer: Line chart | Scatter plot | Statistics; category: Stats}
//editor: Compute2:RichFunctionViewEditor
//meta.runOnInput: true

outputDf = inputDf.clone();
Export results
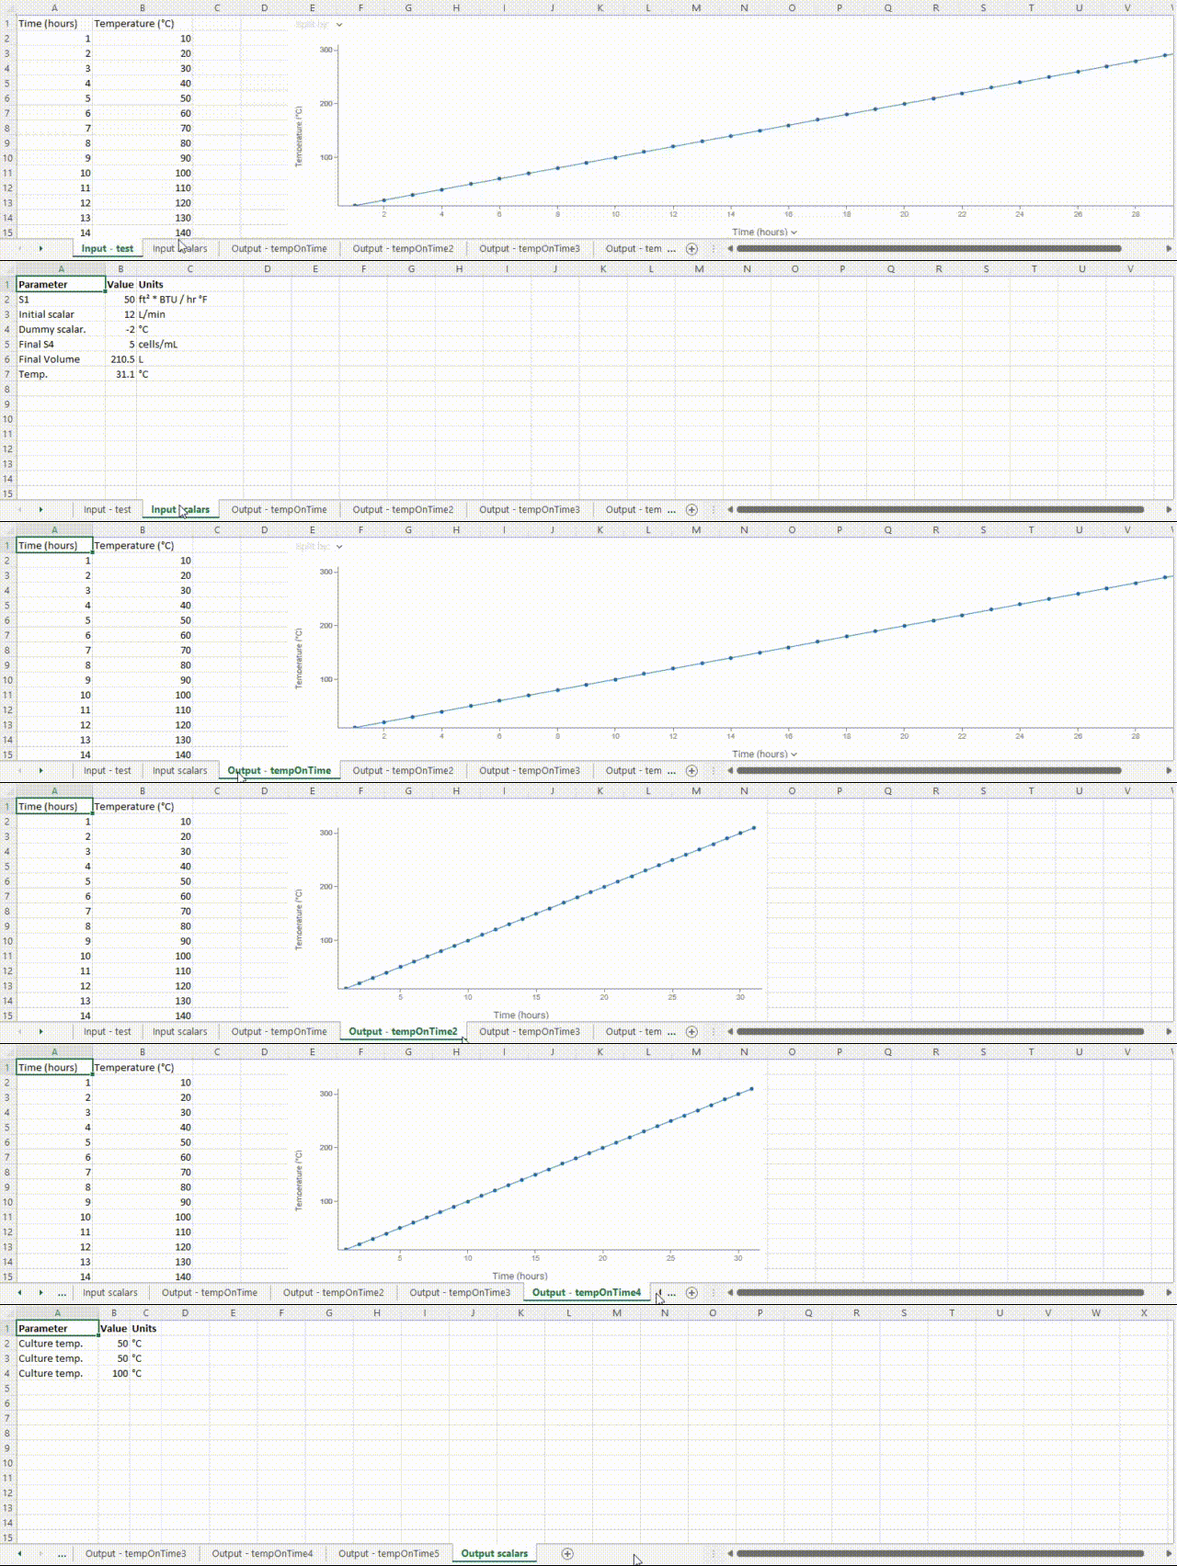
You can use the one-click export feature to save the entire script run to a local file. To generate the export file, Select Export icon on the top panel. The icon runs the first export of the Export menu: the default Excel report, unless a preferred export comes first. Automatic export saves all input and output values with their captions, units, and even viewers' screenshots.
To save the run's visible tables with their viewers as a project, select Save as project... in the same menu.
This feature is available for all scripts using the RichFunctionView.
To disable it, add the meta.features tag to the script header.
- Result
- Disable export
//meta.features: {"export": false}
Customize export
You can customize export using the following annotation:
//meta.customExports: [{"name": "pdf", "function": "MyPackage:MyPDFExport"}]
To make an export the default one, add "preferred": true to it. Preferred exports come first in the
Export menu, in their order, before the default Excel report and the other exports. The first export
of the menu is also the one the icon runs and the bulk export of runs
picks.
//meta.customExports: [{"name": "pdf", "function": "MyPackage:MyPDFExport", "preferred": true}]
The export function receives the following arguments:
funcCall: DG.FuncCall, current call.isOutputOutdated: bool, true if the function output is outdated.runError: string, the error of the run, if it failed.validationState:Record<string, ValidationResult>, available only if run inside a workflows.consistencyState:Record<string, ConsistencyInfo>, available only if run inside a workflows.viewersHook: the viewers hook of the call, the workflow step's own when the step sets one.metaState: the step's meta values by output, for the hook, available only if run inside a workflow.
Declare these as //input: parameters of the export function. The current call must be
typed funccall. Every place that runs the export, the Export menu, a workflow step and the bulk export
of runs, passes the same arguments. The function returns the exported file as DG.FileInfo, and Compute downloads it.
An export that makes several files zips them into one.
Legacy export functions still work: they receive startDownload, always false, and the Blob they
return is downloaded named after the function and the run date, or Not completed, with .xlsx when
the Blob is Excel. Don't use either in a new export.
//name: MyPDFExport
//input: funccall funcCall
//output: file result
export async function myPDFExport(funcCall) {
  const bytes = await buildPdf(funcCall);
  return DG.FileInfo.fromBytes(`${funcCall.func.friendlyName}.pdf`, bytes);
}
To start from the default Excel report, call reportFuncCallExcel from
@datagrok-libraries/compute-api, or the Compute2:ReportFuncCallExcel function. It returns the file and
its ExcelJS workbook, built and named as the export menu builds them, so you can return the file as is, or add
sheets and save the workbook. Pass on the arguments the export gets (CustomExportArgs), so that a workflow
step's report uses the step's hook and meta, and the file is named Not completed for a run that isn't:
const [file, wb] = await reportFuncCallExcel(funcCall,
  {validationState, consistencyState, isOutputOutdated, viewersHook, metaState});
wb.addWorksheet('Notes').addRow(['Reviewed']);
return DG.FileInfo.fromBytes(file.fileName, new Uint8Array(await wb.xlsx.writeBuffer()));
To export a run from your own code, for example from a custom view's button, list the exports with
getCallExports(func) and run one with exportCall(funcCall, exportId, args), both from
@datagrok-libraries/compute-api (or the Compute2:CallExports and Compute2:ExportCall functions). The list
is the run's Export menu, preferred exports and the default Excel report included, and the first one is the
default. exportCall runs an export as the menu does and returns its file; args are the arguments an export
function gets (CustomExportArgs). A saved run exports the same way once it is loaded with its outputs:
const [first] = await getCallExports(funcCall.func);
const file = await exportCall(funcCall, first.id, {isOutputOutdated: false});
DG.Utils.download(file.fileName, new Blob([file.data]));
Workflows also support a workflow-level customExports option with a different handler
signature (it receives the whole pipeline state, not a single call). See the workflow
Custom exports reference for details.
Review and compare historical script runs
Save a run
To keep a run, click Save run on the top panel. In the Save run dialog:
- Pick where to save: My runs or a space, in the tree on the left or by opening its folders on the right. You can't save to a space you can only view.
- The right side shows what's already there: the space's subspaces as folders, then everything else in it, or your runs of this model in My runs. Click a run of this model in a space to overwrite it: Use this name takes its name, so saving replaces that run.
- Enter a Name, and optionally a Description and Tags, then click Save.
My runs lists all your runs of the model, including the ones you saved to spaces, and names can repeat there. The step runs a workflow saves with it aren't listed: open the workflow run instead. In a space, names are unique, ignoring case. If the space already has a run with the name, you're asked to replace it: the new run takes its place in the space, and the old run stays in its author's My runs and in other spaces. A name taken by another item in the space, such as a folder, can't be used.
After saving, the view title shows the model and the run name. It adds (edited) when you change an input. A saved run's inputs and results never change: saving again creates a new run.
Open a run
To load a saved run, click Open runs panel on the top panel. The Runs panel works like a file browser:
- The tree shows My runs and the spaces. The number next to each space is how many runs of the model are in it and in all its subspaces, each run counted once.
- Selecting a space lists its subspaces as folders, then its own runs. Double-click a folder to open it, and
..or Backspace to go up. The path above the list leads back to any level. - A space linked into another space shows under both, with a link mark. Going up returns the way you came.
- A search, tag or author filter finds runs in the selected space and all its subspaces, and the list shows where each run is. Clear filters goes back to the folder. In a space, each run shows its author, and the author filter appears when the runs have more than one author.
- Favorites next to the search shows only your favorite runs, in the selected space and all its subspaces.
- To add a space to your favorites, hover over it in the tree and click the star. The star next to Spaces shows only your favorite spaces and the spaces above them.
Double-click a run, or select it and click Open.
In the panel, you can also:
- Click the star next to a run to add it to your favorites.
- Edit details: change the name, description, and tags of a run you saved, or of a run in a space you can edit. The run keeps its author and save date, and the details show who edited it last. Edit one run at a time.
- Add to space...: add a run from My runs to a space. The space links the same run, and it stays in My runs. Ctrl+click to add several runs at once: each keeps its name, a run already in the space is skipped, and a run with the same name as one in the space replaces it after a confirmation. A run can't be added when the space has a folder or file with its name, or when another selected run has the same name.
- Delete a run in My runs, or Remove from space in a space you can edit, after a confirmation. Ctrl+click to select several runs first. Runs found by a filter are removed from the space each is in, so the selected runs have to be in the same space. A run deleted from My runs can't be restored there, and it stays in the spaces it was added to. A run removed from a space doesn't change.
To browse runs of all models, open the Model Hub and select Tools > Browse Runs.... It starts with All models, which lists the runs of every model in the Model Hub and shows each run's model. Pick a model to see only its runs. Compare takes runs of one model. To compare runs of different models, add them in the run comparison view. Ctrl+click several runs and click Open to open each of them in its own view. In the Runs panel of a model, Open loads one run into the view, so it's available only while one run is selected.
Compare historical runs
To compare saved runs, Ctrl+click them in the Runs panel, then click Compare. To add the current, unsaved state instead, click Add the current state to a comparison on the top panel. Both open the same dialog, where you can change the name of each run for this comparison. When other comparisons are open, the dialog also lets you pick one or start a new run comparison. The dialog warns about outdated outputs of the current state. Saving the state later gives it its final name.
Export runs
To export the runs of a space at once, open the space in the Runs panel and click Export. In My runs, Export takes your runs listed there. The dialog lists each model that has runs to export, with the number of runs and the export to use: the first one in the model's export menu, or another one you pick.
- Include subspaces, on by default, adds the runs of every subspace below the space, each run once. My runs has no subspaces, so the dialog doesn't show it.
- When a search or filter is on, only the runs it shows are exported, and the dialog says so.
- Export is unavailable when there are no runs to export, and at the Spaces level.
- Runs of a model with no exports, such as a custom function view, are left out.
- Runs that aren't completed are greyed out and left out: their outputs are outdated, or a workflow step hasn't run, so their export menu offers nothing. In the Runs panel and the Save run dialog they have a mark. A workflow run saved before this mark existed is checked when it's exported, and skipped with a warning if it isn't completed.
Browse Runs in the Model Hub has Export too, for the runs of the chosen model or of all models. The dialog title names the place and the model filter, for example Export runs of My runs · All models.
In a workflow step's Runs panel, Export uses the step's viewers hook, as the step's own export menu does.
Each run is exported as its export menu does when the run is open. The files go into one zip file named after the space and the date, with a folder for each subspace. Files with the same name in a folder get a number. Runs are exported one at a time. Cancel stops the export without saving the zip. Runs that couldn't be exported are listed in the dialog, and the zip has the rest.
Model parameters optimization
With RichFunctionView you can use the powerful built-in optimization functions.
Both Sensitivity analysis and Parameter optimization trigger
many simultaneous runs of the model. We recommend using these
features on fast Javascript and WebAssembly scripts to avoid
repeatable running of heavy server-side code.
Sensitivity analysis
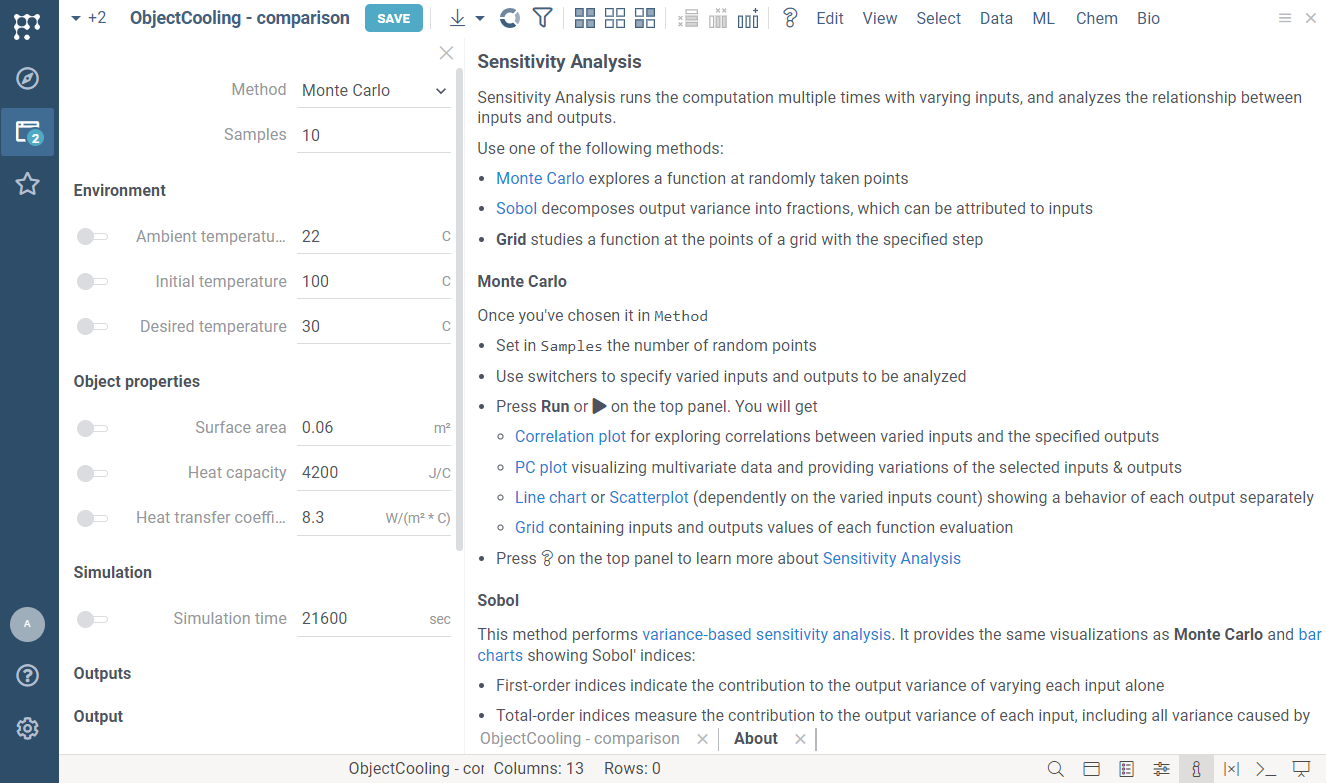
Sensitivity analysis automatically runs the computation multiple times with varying inputs, and analyzes the relationship between inputs and outputs.
- Result
- Short sample
- Full sample
//meta.features: {"sens-analysis": true}
//name: Object cooling
//description: Uses Newton's law of cooling to simulate object cooling process. Default values are for cube of boiling water in air.
//language: javascript
//tags: simulation, demo
//input: double ambTemp = 22 {caption: Ambient temperature; units: C; category: Environment }
//input: double initTemp = 100 {caption: Initial temperature; units: C; category: Environment }
//input: double desiredTemp = 30 {caption: Desired temperature; units: C; category: Environment }
//input: double area = 0.06 {caption: Surface area; units: m²; category: Object properties}
//input: double heatCap = 4200 {caption: Heat capacity; units: J/C; category: Object properties }
//input: double heatTransferCoeff = 8.3 {caption: Heat transfer coefficient; units: W/(m² * C); category: Object properties}
//input: int simTime = 21600 {caption: Simulation time; units: sec; category: Simulation }
//output: dataframe simulation {caption: Temp. vs time; category: Output; viewer: Line chart | Grid}
//output: double timeToCool {caption: Time to cool; units: sec.; category: Output}
//output: double coolingFactor {caption: Cooling factor; units: 1 / sec.; category: Calculations}
//output: double tempDiff {caption: Temperature difference; units: C; category: Calculations}
//editor: Compute2:RichFunctionViewEditor
//meta.features: {"sens-analysis": true}

timeToCool = undefined;

const tempDiff = initTemp - ambTemp;
const coolingFactor = heatTransferCoeff * area / heatCap;

const timeStamps = new Float32Array(simTime).map((_, idx) => idx);
const simulatedTemp = timeStamps.map((timeStamp) => {
  const currentTemp = ambTemp + (tempDiff * (Math.E ** -(coolingFactor * timeStamp)));

  if (!timeToCool && currentTemp < desiredTemp) {
    timeToCool = timeStamp;
  }

  return currentTemp;
});

simulation = DG.DataFrame.fromColumns([
  DG.Column.fromFloat32Array('Time', timeStamps),
  DG.Column.fromFloat32Array('Temperature', simulatedTemp),
]);
Parameters optimization
The parameters optimization solves an inverse problem to the sensitivity analysis: finding the input conditions that lead to a specified output of the model. It computes inputs minimizing deviation measured by loss function.
To enable parameters optimization, set the fitting feature flag:
//meta.features: {"fitting": true}
Tuning fitting defaults
You can override the parameter-fitting view's default settings with meta.fittingSettings. The
value is a JSON object that is merged with the platform defaults at startup; anything you do not
set keeps its default. The schema is defined alongside the optimizer in
libraries/compute-utils/function-views/src/fitting/optimizer-api.ts.
//meta.fittingSettings: {"method": "Nelder-Mead", "maxIterations": 200}